We always end up with a few bananas on the counter that get a little too ripe, and at some point nobody really wants to eat them anymore. Instead of throwing them away, this time I used them to make easy banana Nutella crepe rolls that turned out way better than expected.
At home, we make crepes all the time, so we’re always looking for small ways to change things up. The kids never get tired of them either.
This time, I went with a classic combination. Nutella and bananas. It always works, especially when the bananas are already nice and ripe, since they’re softer and naturally sweeter.
What makes this version a bit different, though, is how you serve them. Instead of folding the crepes like usual, you roll them up and slice them, which gives you those clean little spirals and makes them easy to eat.
From there, you can keep them simple or add a few extras like whipped cream or some toppings if you want something a bit more indulgent.
What Makes These So Addictive
There’s a reason people keep coming back to this recipe. It’s not just the chocolate and banana, even though that alone is already a perfect combo.
It’s the texture contrast and the format.
You get:
- Soft, slightly elastic crepes that wrap everything together
- Creamy chocolate spread that melts just enough
- Sweet banana that adds natural richness
- Clean little slices that are easy to grab and eat
It’s the kind of dessert that disappears from the plate faster than expected. Especially when served in bite-sized pieces.
Ingredients You’ll Need
How to Make Banana Nutella Crepe Rolls
For the crepes(if you make your own)
- 250 g all-purpose flour
- 4 eggs
- 500 ml milk
- 20 g sugar
- 20 g melted butter
- A pinch of salt
This is a classic French crepe base. Nothing unusual here, but the balance matters.
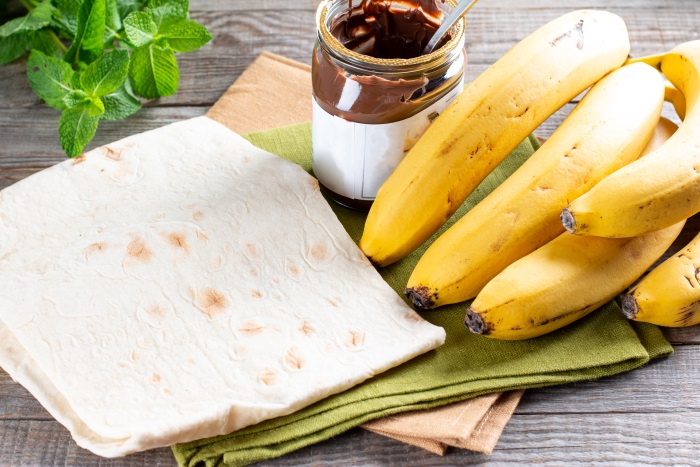
For the filling
- 3 to 4 ripe bananas
- 100 to 150 g chocolate spread (Nutella works perfectly)
Optional extras:
- Crushed hazelnuts
- Shredded coconut
- A drizzle of honey or caramel
Step 1: Prepare the crepe batter
Start by combining flour, sugar, and salt in a large bowl. Crack in the eggs and begin whisking. Slowly pour in the milk while mixing to avoid lumps.
Keep whisking until the batter becomes smooth and fluid. It should be thinner than pancake batter, almost like light cream.
Add the melted butter at the end and mix again.
If you have time, let the batter rest for about 20 to 30 minutes. This helps the flour hydrate properly and improves the texture of the crepes.

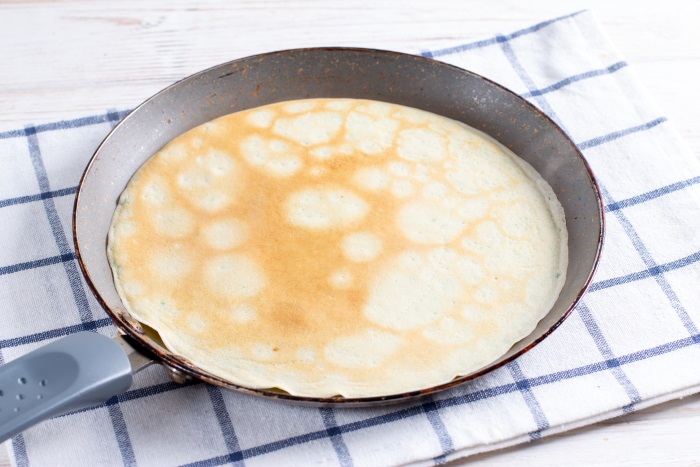
Step 2: Cook thin, flexible crepes
Heat a non-stick pan over medium heat and lightly grease it with butter.
Pour a small ladle of batter into the pan and immediately swirl it around to create a thin, even layer.
Cook for about 1 minute until the edges start lifting slightly, then flip and cook the other side briefly.
You’re not aiming for crispy or deeply golden crepes here. Soft and flexible is exactly what you want.
Stack the cooked crepes on a plate and let them cool slightly before assembling.
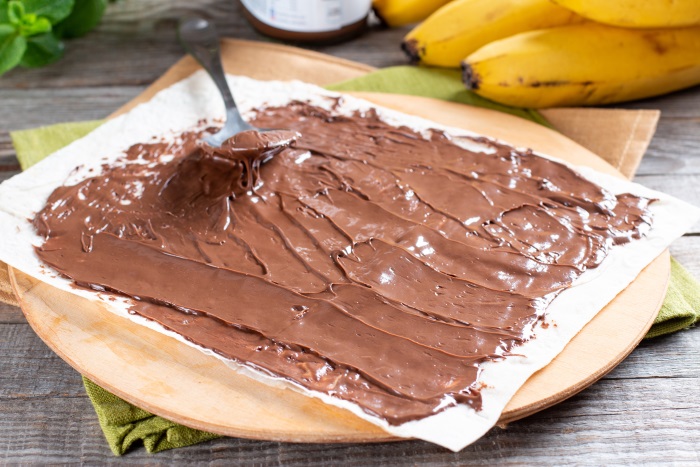
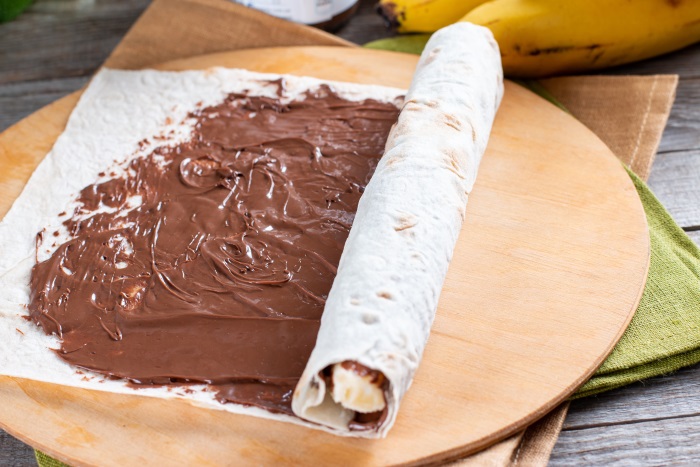
Step 3: Spread the chocolate evenly
Take one crepe and lay it flat on a clean surface.
Spread a thin, even layer of chocolate spread across the entire surface. Don’t go too heavy here. It might be tempting, but too much filling will make rolling messy and slicing difficult later.
A balanced layer gives you better structure and cleaner results.
Step 4: Add the banana and roll tightly
Place a whole peeled banana near one edge of the crepe.

Start rolling from that side, keeping the roll as tight as possible without tearing the crepe.
This step is where the final look is decided. A loose roll will fall apart when slicing, while a tight roll holds its shape and gives you that clean spiral effect.
Repeat with the remaining crepes.
Step 5: Chill for cleaner slicing
This step isn’t mandatory, but it makes a noticeable difference.
Place the rolled crepes in the fridge or freezer for about 15 to 20 minutes. This firms everything up slightly, making it much easier to cut clean, even pieces.
If you skip this step, the rolls will still taste great, but the slices may look softer and less defined.
Step 6: Slice into rolls
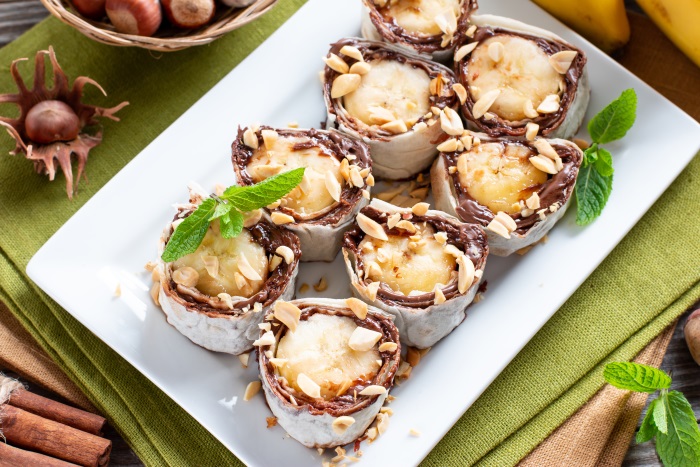
Using a sharp knife, cut each roll into pieces about 2 to 3 cm thick.
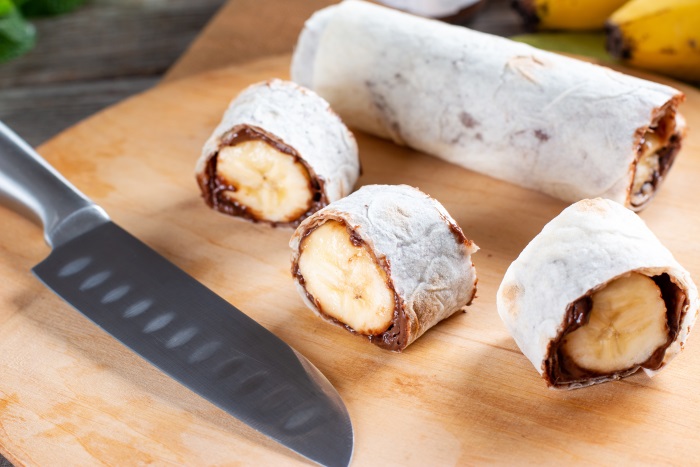
Wipe the knife between cuts if you want really clean edges. It’s a small detail, but it helps the presentation a lot.
Once sliced, you’ll see that spiral pattern inside, with banana at the center and chocolate wrapped around it.
That’s the moment where it starts to look like a proper dessert rather than just a rolled crepe.

Banana Nutella Crepe Rolls Recipe
Share on Facebook Share by EmailIngredients
- 4 thin crepes
- 4 ripe bananas
- 120 g Nutella
- 1 tbsp butter for cooking
- Optional: whipped cream toppings
Instructions
- Warm the crepes slightly so they’re soft and easy to roll.
- Spread a thin layer of Nutella over each crepe.
- Place a whole banana near one edge.
- Roll the crepe tightly around the banana.
- Slice into small pieces using a sharp knife.
- Serve as is or with whipped cream and toppings.
Notes
Calories: 320 kcal
Carbohydrates: 45 g
Protein: 6 g
Fat: 12 g
Sugar: 22 g
Tips That Make a Real Difference
A few small adjustments can take this from good to noticeably better.
Use bananas that are ripe but still firm. Overripe bananas will become too soft and affect the structure of the roll.
Keep the chocolate layer moderate. Too much filling leads to slipping and uneven slices.
Let the crepes cool slightly before assembling. Warm crepes can melt the chocolate too quickly and make rolling harder.
If presentation matters, don’t skip the chilling step. It’s the easiest way to get clean, café-style slices.
Flavor Variations You Can Try
Once you’ve made the basic version, it’s easy to switch things up.
Swap the banana for strawberries or sliced pears for a different flavor profile.
Use dark chocolate instead of a sweet spread for a richer taste.
Add crushed hazelnuts inside the roll for a bit of crunch.
Sprinkle coconut flakes over the slices for extra texture and visual appeal.
You can even drizzle melted chocolate on top after slicing if you want a more indulgent finish.
Serving Ideas That Work Every Time
These crepe rolls are flexible when it comes to serving.
They work well as a quick dessert after a meal, especially when plated neatly.
They’re also great for gatherings since people can just grab a piece without needing utensils.
For something more complete, serve them with a scoop of vanilla / lemon ice cream or a bit of whipped cream on the side.
If you’re going for presentation, arrange the slices in a circular pattern or stack them slightly. It takes almost no extra effort but makes the dish look more intentional.
Storage and Make-Ahead Tips
If you’re planning ahead, you can prepare the crepes earlier in the day and store them covered.
The assembled rolls can also be kept in the fridge for several hours before slicing.
Once cut, they’re best eaten the same day. The banana can start to soften and change texture if left too long.
If needed, a light squeeze of lemon juice on the banana before rolling can help slow that process without affecting the flavor too much.
Why This Recipe Works So Well
There’s a simplicity here that makes the recipe reliable.
The ingredients are basic, the steps are straightforward, and the result feels more impressive than the effort required.
It’s also adaptable. You can keep it minimal or dress it up depending on the situation.
And maybe the biggest advantage is how approachable it is. No baking, no complicated timing, no special equipment.
Just a pan, a bowl, and a bit of patience while rolling.
A Quick Reality Check
If the first roll isn’t perfect, that’s completely normal.
Crepes can tear, filling can shift, slices might not look perfectly even. None of that really matters once you taste them.
By the second or third roll, everything usually clicks into place anyway.
